Wilderness Lashing Installation
Trailers and racks are galvanized, all trailers include a tongue jack and use a 2″ ball. Suspensions are leaf springs, torsion axle upgrades are available where noted.
Step 1: Slide the triglide fitting over one end of the strap.

Step 2: Insert the end of the strap through the other opening in the triglide fitting.

Step 3: Insert the end of the strap through the D-ring that is mounted to the inside of the canoe.

Step 4: Bring the strap back to the triglide fitting and thread it through the triglide as shown.

Step 5: Thread the end of the strap through the other opening in the triglide fitting.

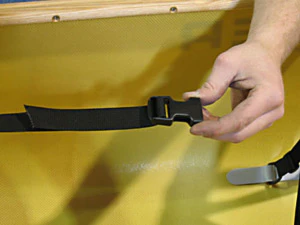
Step 6: Pull the strap tight and adjust the triglide fitting so that it is about 2-3 inches from the D-ring. Allow the end of the strap to hang over about 2-3 inches past the triglide fitting.

Step 7: On the other end of the strap, a fastek buckle will be attached. Note that the serated bar on the fastekbuckle is facing up.

Step 8: Insert the strap through the opening closest to the buckle opening.

Step 9: Feed the strap over the serated bar and through the other buckle opening.

Step 10: Pull the strap tight and adjust the fastek buckle so that about 2-3 inches of strap is exposed. Adjust the overall length of the strap by sliding the end of the strap through the fastek buckle.
Complete the installation by installing the other straps, making sure that the mate to the fastek buckles are properly aligned with the opposing straps.
D-Ring Installation Instructions
Lashing points for gear tie-down. These d-rings can be installed throughout the canoe to provide the necessary lashing points to keep gear from shifting, in addition to keeping the load together in the event of an upset.
- 1. Mark the location for the d-ring bases on the boat with a pencil
- 2. 1” tie down d-rings for float bags or gear tie downs are normally glued into the chine or curved area between the side and bottom of the canoe.
- 3. Sand both the hull area concerned and the grey d-ring base with coarse sandpaper. After sanding, avoid contaminating these surfaces with dirt, grease, fingerprints, etc.
- 4. At room temperature, working time of the mixed adhesives is about 5-10minutes, setting time is about 30minutes and full strength should be achieved overnight.
- 5. Note: If the d-ring becomes stuck to the adhesive, it can be loosened by pivoting it in its base after the adhesive has been fully cured.